
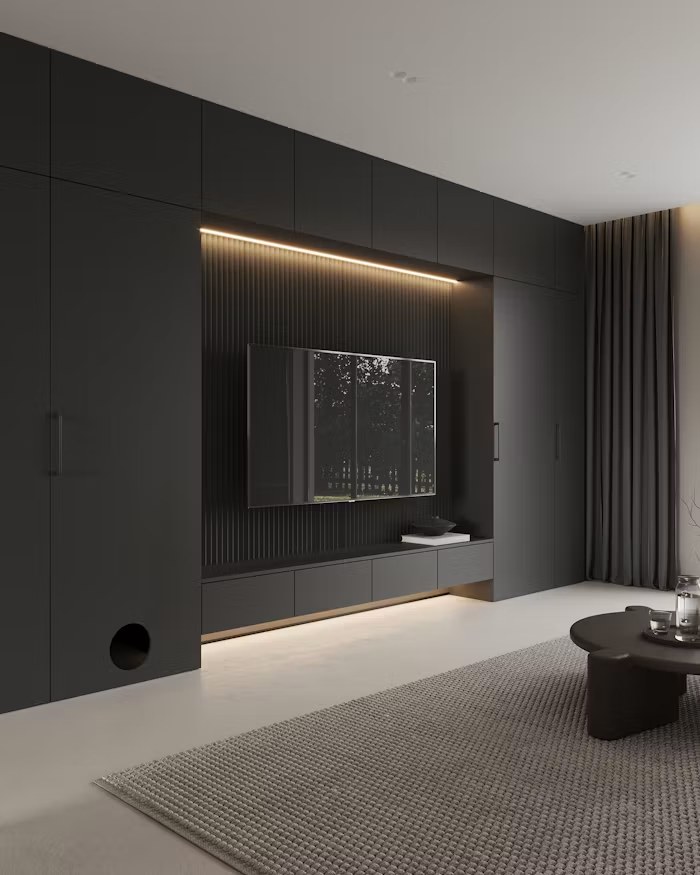
A basement feature wall can organize entertainment equipment, storage, and display space into one deliberate composition. A TV centred within a vertical arrangement of shelves or cabinets draws the eye upward, which is useful in basements where floor area is limited and ceilings can feel low.
The strongest designs balance appearance with viewing comfort, ventilation, wiring access, and storage. The television itself should remain in its intended landscape orientation; “vertical” describes the floor-to-ceiling composition around it, not a rotated screen.
Start with the Room, Not the Finish Material
Before choosing wood slats, stone, paint, or cabinetry, map the wall and the room around it. Measure the available width, ceiling height, viewing distance, door swings, traffic paths, and furniture placement. Mark bulkheads, columns, outlets, vents, and access panels that cannot be covered.
Decide what the feature wall must hold. A simple television and soundbar require a different structure than a fireplace, gaming consoles, speakers, books, and closed storage. Designing around the full equipment list prevents exposed cords and crowded shelves later.
Build a Balanced TV-and-Shelf-Tower Layout
Centre the TV with one tower
An asymmetrical layout can work well on a narrow wall. Place the TV on the visually heavier side and use a tall shelf tower to balance it. Repeat the shelf finish in a low console or wall panel so the tower feels connected to the composition.
Frame the TV with two towers
Matching towers create symmetry and generous storage. Keep the shelf openings simple, especially if the TV wall already includes strong texture. Closed lower cabinets can hide controllers, games, and cables while open upper shelves display a limited number of objects.
Combine a low media cabinet with a tall tower
This layout leaves more open wall around the television and can make a smaller basement feel less built-in. A floating base cabinet also keeps more floor visible, although its mounting and load requirements must be considered early.
Extend the composition to the ceiling
Full-height slats, panels, or cabinetry emphasize vertical lines and visually stretch the wall. Leave appropriate clearances at ceilings, bulkheads, and mechanical elements, and avoid sealing off anything that requires service access.
Choose a Feature-Wall Material
Painted drywall
Painted drywall is clean, flexible, and easy to update. A matte or low-sheen finish reduces reflected light around the screen. Use colour to create contrast, but check the wall under daytime and evening lighting before committing.
Wood slats or panels
Wood introduces warmth and rhythm. Slatted treatments can also conceal portions of a wiring route or access panel when designed carefully. The backing colour, slat spacing, and transitions at shelves determine whether the result looks refined or busy.
Stone or brick-look finishes
Textured surfaces create a strong focal point, especially when paired with restrained cabinetry. Confirm the weight, substrate, edge details, and mounting plan before installation. The TV bracket must connect to appropriate structural support rather than relying on the finish alone.
Custom millwork
Built-in cabinets provide the most control over proportions and storage. Plan ventilation for media equipment, cable paths between compartments, removable access panels, and enough depth for actual devices and plugs.
Position the TV for Comfortable Viewing
Choose the screen size and mounting height based on the seating location, not the height of the wall. The centre of the screen should be comfortable to view from the primary seat without requiring a constant upward tilt of the head.
If a fireplace sits below the television, follow the fireplace and television manufacturers’ clearance requirements. A mantel or heat-management detail may be needed, and the screen may end up higher than ideal. Test the proposed screen position on the wall before framing begins.
Make the Shelf Tower Functional
Group the tower’s contents into three categories: display, everyday access, and concealed storage. This prevents every shelf from becoming a mix of décor, electronics, and clutter.
- Use upper shelves for art, books, or objects that do not need daily access.
- Keep controllers and media devices within comfortable reach.
- Use closed cabinets for cables, spare equipment, and less attractive items.
- Size shelf openings around the objects you actually own.
- Provide ventilation where electronic equipment generates heat.
Integrated lighting can make the tower feel architectural. Place LED strips where the light source is concealed, provide a route to a driver or transformer, and keep components accessible for future replacement.
Plan Wiring Before Closing the Wall
A clean feature wall depends on an organized electrical and low-voltage plan. Confirm locations for power, data, HDMI or other signal paths, speakers, the soundbar, gaming systems, and lighting controls.
Avoid permanently burying loose consumer cables inside wall cavities. Use appropriate in-wall-rated components and accessible pathways. If equipment will sit in a side tower or lower cabinet, verify that cable runs can reach it without tight bends or blocked connectors.
Coordinate Lighting with the Screen
Use lighting to reveal texture without creating glare. Ceiling fixtures placed too close to the screen can reflect on it, while exposed shelf LEDs can become distracting during viewing.
A practical plan may include dimmable ambient lighting, concealed shelf lighting, and a soft backlight behind the screen. Put entertainment lighting on separate controls so the room can shift from cleaning and everyday use to movie viewing.
Avoid Common Feature-Wall Mistakes
Common problems include:
- Mounting the TV too high
- Designing shelf openings before selecting equipment
- Providing no ventilation inside cabinets
- Covering outlets, shutoffs, or access panels
- Choosing a finish without confirming its weight and substrate
- Installing a fireplace without coordinating heat clearances
- Leaving no route for future cable replacement
- Filling every shelf and losing the intended focal point
Mock up the TV outline, cabinet heights, and shelf openings with painter’s tape. This simple step reveals proportion problems before materials are ordered.
Connect the Feature Wall to the Rest of the Basement
Repeat one or two materials elsewhere in the room—a wood tone, cabinet colour, or metal finish—to make the feature wall feel integrated. Keep nearby flooring and furniture quieter if the wall has strong texture.
If you are comparing the wider renovation scope, review the TV wall cost guide and the basement renovation cost guide separately. This page is focused on layout and detailing rather than pricing.
Create a Feature Wall That Works as Well as It Looks
A successful basement TV wall aligns comfortable viewing, balanced storage, safe mounting, accessible wiring, and restrained materials. When those decisions are resolved before construction, the finished wall looks simpler because the technical details are concealed without being inaccessible.
GMC Construction designs and builds basement renovations across Toronto and the GTA. To discuss a TV-and-shelf feature wall for your basement, call 647-450-4466.
Ready to turn this into a real project?
Take what you just read and connect it to our basement renovation service — we’ll scope project type, location, timing and budget so you get an accurate quote.
Get a free estimate for your project
Tell us what you're planning and our team will get back to you within 24–48 hours. No obligation.