
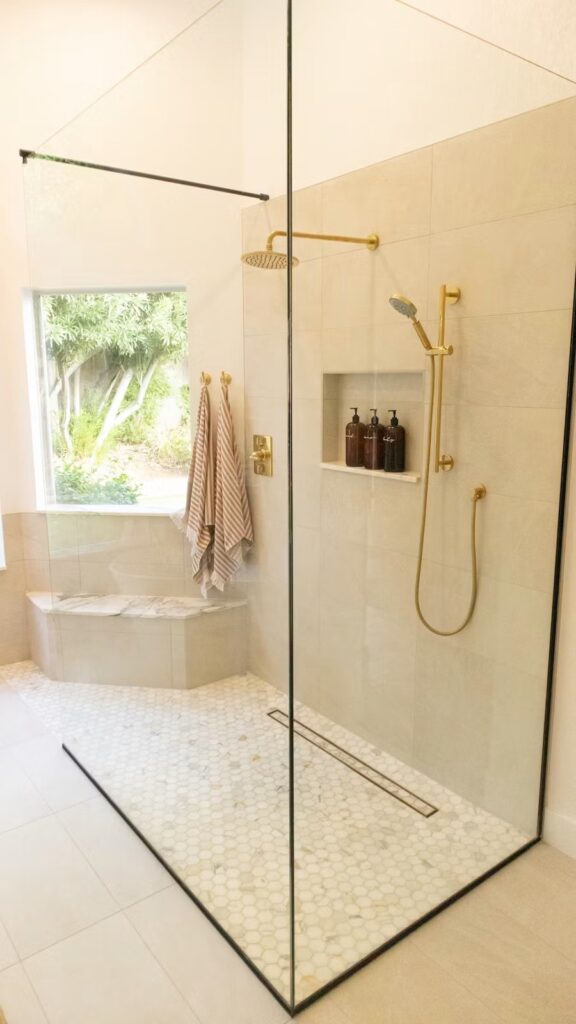
A curbless shower removes the raised curb between the bathroom floor and shower area. The continuous surface can make a bathroom feel larger, simplify entry, and support an accessible or aging-in-place design. The clean appearance depends on careful construction below the tile. Floor height, slope, drain location, waterproofing, doorway placement, and water containment must work together. A curbless shower should therefore be planned as a complete bathroom system, not as a standard shower with the curb omitted.
How a Curbless Shower Works
Water must flow toward the drain without spreading into the dry bathroom area. To create that slope while keeping the entry level, the shower floor may need to be recessed, modified, or built with a carefully coordinated assembly. The available approach depends on the floor structure, room size, joist direction, concrete slab, drain location, and selected waterproofing system. The project team should resolve:
- Finished floor heights
- Required slope to the drain
- Waterproofing limits and transitions
- Drain type and connection
- Structural effects of any floor modification
- Glass or screen placement
- Showerhead direction and spray pattern
- Heating and ventilation
- Slip resistance and maintenance
These decisions should be made before tile is ordered.
Curbless Shower Feature Comparison
The key design features are compared below.
| Design feature | Main benefit | Planning consideration |
|---|---|---|
| Frameless glass | Open sightlines and a modern appearance | Glass size, hardware support, water splash, cleaning, and door movement |
| Linear drain | Supports a clean layout and directional floor slope | Drain capacity, placement, waterproofing connection, and access for cleaning |
| Natural stone | Rich variation and a spa-like finish | Slip resistance, sealing, maintenance, and compatibility with the shower system |
| Floating vanity and open storage | Keeps more floor visible and can improve access | Wall support, water-resistant materials, plumbing, and practical storage |
| Integrated lighting | Improves visibility and atmosphere | Wet-location suitability, glare, controls, and service access |
| Barrier-free entry | Easier entry and reduced trip risk | Floor slope, clear space, grab-bar planning, and water containment |
| Large-format or patterned tile | Creates a strong visual direction | Slip resistance, floor slope, tile cutting, grout, and drain coordination |
Use Frameless Glass to Preserve Openness
Frameless glass can make the shower and bathroom read as one larger space. Clear glass maintains sightlines, while fluted, tinted, or lightly obscured glass can provide more privacy. The design must still control water. A fully open shower may allow splash and cool air to escape, especially in a compact room. A fixed panel or carefully positioned door can preserve the open look while improving comfort. Glass should be selected and measured after the tile work is complete unless the project’s glazing process requires otherwise. Wall support and hardware locations should be planned earlier.
Choose the Drain Based on the Floor Plan
Linear Drains
A linear drain can run near a wall or at another planned location. It may allow the shower floor to slope in one main direction, which can work well with larger tiles. The drain body, waterproofing connection, grate, and plumbing route must be coordinated as one system. The channel should remain accessible for cleaning.
Centre or Point Drains
A point drain can be an effective and familiar solution. The floor slopes from several directions, which may suit smaller tile formats that can follow the changing plane. The drain should be positioned intentionally within the tile layout. An off-centre drain can look accidental unless it supports the room’s construction constraints and design.
Plan the Floor Structure Before Selecting Tile
Creating a level entry may require changes below the finished surface. In a wood-framed floor, joist direction and depth matter. In a basement or condominium slab, the drain and recess strategy may be different. Structural members should not be cut or altered without appropriate review. GMC Construction is led by a civil engineer with a master’s degree in structural engineering, providing valuable technical perspective when a curbless shower affects the floor structure. The selected shower system should provide a buildable transition from the bathroom floor into the wet area.
Treat Waterproofing as One Continuous System
Tile and grout are finish materials; they are not the complete waterproofing strategy. The membrane, drain connection, corners, penetrations, niches, benches, and transitions must work together. Extend waterproofing beyond the most obvious spray area where the design and system require it. Pay special attention to the open entry, glass hardware, plumbing penetrations, and any junction between different materials. A flood test or other verification may be appropriate before tile installation, depending on the system and project requirements.
Select Slip-Resistant Shower Flooring
The shower floor should provide reliable traction when wet. Finish texture, tile size, grout pattern, maintenance, and product suitability all influence performance. Natural stone is not automatically slip resistant. Polished surfaces can become slippery, while honed or textured products may provide better traction. Stone can also require sealing and specific cleaning products. Large-format tile can create fewer grout joints, but it must conform to the floor slope. A linear-drain layout may make large tile easier to use than a floor sloping from several directions.
Use Tile Layout to Emphasize the Level Entry
A continuous tile or coordinated colour palette can visually connect the shower and bathroom. The tile does not have to be identical everywhere; related materials can define the wet zone while maintaining flow. Options include:
- One tile across the floor with a directional drain
- Smaller textured tile in the shower and larger tile outside
- A contrasting shower zone framed by the glass
- Large wall slabs with a simpler floor tile
- Vertical or stacked wall patterns that increase the sense of height
Lay out grout lines, niches, benches, valves, and glass edges before installation. Small cuts at the drain or doorway can weaken an otherwise clean design.
Add a Bench Without Blocking the Shower
A bench can support bathing, shaving, or accessibility. It may be built in, floating, or fold-down depending on the user and room. The seat needs proper slope, waterproofing, support, and comfortable placement relative to the controls and shower spray. A bench should not narrow the entrance or make transfer and circulation more difficult. If the shower is intended for aging in place, plan the bench, controls, handheld shower, and grab-bar support together.
Plan Grab-Bar Support Before Closing the Walls
Grab bars can be useful in bathrooms of many styles and ages. Even when bars are not installed immediately, wall reinforcement can be added during renovation so they can be installed later. The useful location depends on how the person enters, stands, sits, and reaches the controls. Decorative placement is less important than practical support. Do not assume that tile, drywall, or backer board alone will support a grab bar.
Position Shower Controls for Easier Use
Controls should be reachable without standing directly under the water. A handheld shower can improve flexibility for seated use, children, cleaning, and pets. Consider locating the control near the entrance while keeping the showerhead on a wall that directs spray away from the opening. Valve location affects plumbing work, wall depth, and the glass plan. Coordinate niches and shelves so bottles remain accessible without interfering with grab bars or spray.
Use Floating Vanities and Open Floor Space
A wall-mounted vanity keeps more floor visible and can reinforce the open appearance of a curbless shower. It can also simplify cleaning and provide knee space in an accessibility-focused design when appropriately planned. The wall needs suitable support, and plumbing should be placed accurately before the vanity arrives. Open shelves look light but expose items to moisture and visual clutter. Closed drawers are often more practical for everyday storage.
Improve Lighting Without Creating Glare
Curbless showers benefit from even, comfortable lighting. A bright ceiling fixture alone may create shadows or glare on glass and polished tile. Combine general lighting with vanity lighting and suitable wet-area fixtures. Integrated niche lighting can add atmosphere but requires careful waterproofing and service planning. Use separate controls or dimming where appropriate. Check how the lighting reflects in mirrors and glass from normal standing and seated positions.
Coordinate Ventilation and Bathroom Heat
An open shower can release more moisture into the room and may feel cooler than an enclosed stall. The bathroom ventilation system should be reviewed as part of the renovation. Heated floors can improve comfort, but the heating system must be coordinated with the shower assembly, waterproofing, thermostat, and floor transitions. Product compatibility and installation requirements should guide the design.
Curbless Showers in Small Bathrooms
A level-entry shower can make a compact bathroom feel less divided, but water containment becomes especially important when the shower is close to the vanity or door. Use a fixed glass panel, appropriate showerhead, carefully planned spray direction, and floor slope to keep the dry zone practical. Wall-mounted fixtures and storage can preserve circulation. Do not remove every enclosure simply to make the room look larger. The bathroom must still be comfortable to use and easy to maintain.
Curbless Showers in Condominiums
Condominium bathrooms may have restrictions related to the slab, drains, waterproofing, plumbing shutdowns, working hours, and management approvals. Review the alteration agreement and building requirements before finalizing the design. A desired floor recess or drain relocation may not be possible without specific approval. Plan material deliveries, elevator bookings, debris removal, and protection of common areas as part of the scope.
Common Curbless Shower Mistakes
Avoid:
- Treating the shower as a standard base without a curb
- Choosing the drain after framing or floor work
- Cutting structural members without proper review
- Using tile that cannot follow the required slope
- Ending waterproofing too close to the opening
- Directing the shower spray toward the bathroom
- Forgetting support for glass or grab bars
- Placing controls where users must step into cold water
- Ignoring ventilation and room comfort
- Creating inaccessible drain channels or service components
Detailed planning before demolition is the most effective way to avoid these problems.
The Curbless Shower Renovation Process
Assessment and Layout
The contractor reviews the floor structure, drain route, room dimensions, fixtures, desired entry, and accessibility goals.
System Selection
The drain, waterproofing assembly, tile, glass, fixtures, bench, lighting, and heating are coordinated.
Structural and Plumbing Work
Required floor modifications, support, drain work, and valve rough-ins are completed.
Waterproofing and Verification
The shower assembly, corners, penetrations, entry, niche, and drain are waterproofed according to the selected system.
Tile, Glass, and Fixtures
Tile is installed to the planned slopes and layout. Glass, fixtures, controls, accessories, and finishing work follow in the correct sequence.
Final Review
Drainage, controls, doors, glass, sealant, lighting, ventilation, and the surrounding floor are checked before turnover.
Why Choose GMC Construction
GMC Construction completes bathroom renovations and curbless showers across Toronto and the GTA, including Richmond Hill, North York, Thornhill, Markham, and Vaughan. The team can coordinate structural review, plumbing, waterproofing, electrical work, tile, glass, cabinetry, and finishing as one renovation scope.
Conclusion
A curbless shower can create a safer, more open, and more adaptable bathroom, but its success depends on the construction below the finish. Floor structure, slope, drainage, waterproofing, glass, spray direction, and accessibility features must be coordinated from the beginning. Choose design elements that support the room and the people using it. When the technical plan is correct, frameless glass, thoughtful lighting, durable tile, and integrated storage can create a shower that is both practical and visually calm. Planning a curbless shower in Toronto or the GTA? Contact GMC Construction to review your bathroom and renovation goals. Call 647-450-4466.
Ready to turn this into a real project?
Take what you just read and connect it to our bathroom renovation service — we’ll scope project type, location, timing and budget so you get an accurate quote.
Get a free estimate for your project
Tell us what you're planning and our team will get back to you within 24–48 hours. No obligation.
